Understanding Lower Crossed Syndrome, Hip Anatomy and Essentials to Becoming a True “Hipster”.

There is a magical place in the body where Physical Therapy and Yoga Therapy meet. It’s called the hip. It’s a wonderful and amazing system of articulation as long as all systems are go. Because it is a closed system, any small leak (Labrum tears, bursitis, osteoarthritis) create a cascade of effect on the entire lower kinetic chain.
Imagine the sacroiliac joint, for example. You start having pain there so off you go to the orthopedic surgeon who diagnoses you with Sacroiliac Joint Dysfunction. It sounds really fancy, but think about it. You already knew there was abnormal function there. Before you go dashing off for cortisone injections or endless trips to the Chiropractor, let’s consider WHY this might be happening. If we are to really understand this, we must dig for the roots. Don’t just mow the grass! To continuously mobilize an unstable sacroiliac joint (SIJ) or inject it with anti-inflammatory agents is just putting a temporary band aid on the problem. It’s just mowing the grass. Look above and look below and find what isn’t moving well. When we do that, we often find the true problem in the hip.
We are a society of sitters. We don’t sit on the floor as some cultures do and as a result there are patterns of tightness unique to chair sitters. When you consider the myriad of diagnoses in the lower quarter (back pain, SIJ pain, osteoarthritis, tendonitis, bursitis, hip labral tears, knee problems, etc., etc.), it’s easy to discount the role of hip function.
If I am going to sit in the car, I’m going to need at least 100 degrees of pure hip flexion (bending), but if I sit most of the day in my office chair and my psoas and hip flexors are even slightly tight, this will cause the ball of the hip ball and socket joint to translate forward to the front part of the socket. Over time, this can cause impingement or pinching in the front of the hip. To avoid that discomfort, I might move my leg out to the side (abduction and external rotation) to find comfort. I might also hike the hip a bit to avoid coming into true hip flexion. If I habitually move the leg to the side, the piriformis muscle and abductors will become shortened. If I habitually hike the hip in an effort to create false hip flexion, the quadratus lumborum will become shortened. Now in addition to an unstable SIJ, someone tells you about your Piriformis Syndrome or spasm of the Quadratus Lumborum and the domino effect begins to take shape. Over time and then maybe in combination with loading and rotation (golf, soccer, gymnastics, ballet, revolved weight bearing Yoga postures) the anterior translation of the head of the femur in the acetabulum (socket) can lead to tears in the acetabular labrum that runs all the way around the acetabulum, increasing the weight bearing surface of the hip and acting as a major shock absorber. Any disruption like this in the internal system of the hip will lead to less lubrication of the joint, osteoarthritis of the hip and, if severe enough, this is just one of the ways we become a candidate for total hip replacement. So we can see it is almost never just one of these things. The unstable SIJ will usually co-exist with piriformis syndrome, a tight quadratus lumborum (QL), lumbar rotation toward the side of the tight QL and most importantly decreased true free hip flexion!
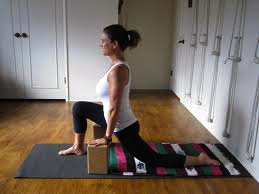
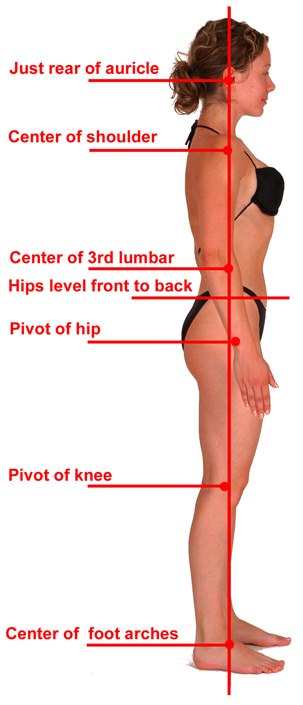
When we look at this client posturally, we see what is known as a Lower Crossed Syndrome. It is characterized by tight hip flexors and lumbar errector spinae (lower back muscles) and weak, inhibited gluteal and abdominal muscles. The imbalance leads to anterior pelvic tilt, increased hip flexion and hyperlordosis of the lumbar spine. See images below:


In the image on the left, note the lines of weakness and lines of tightness and in the image on the right, you can appreciate how gravity acting on that would cause an enormous load on the anterior structures of the hip itself. What’s missing on the model on the right is the role of the hamstrings as they insert on the ischia (sit bones)! The client may come to you swearing they injured the hamstring. They are going to FEEL it there because the hamstrings are strained, the hamstrings are trying desperately to right the anterior tilt of the pelvis! If you stretch the hamstrings early in this process, you will likely make the problem worse because now the pelvis can come even more anterior.
In treatment with Yoga Therapy, I find this sequence to be most effective:
**IGNORE STRETCHING THE HAMSTRINGS! That’s right. Ignore them. They are overstretched already and guarding to protect further anterior movement of the pelvis.
First create a relaxation or parasympathetic response of the nervous system by having the client use the 3-part diaphragmatic or dirgha breath in Supta Bhadda Konasana ( you are getting a nice psoas and pectoral release at the same time). You can add ujayi and bandha locks as the client understands and progresses.

Secondly, you’ll want to use a method for creating space in the hip joint itself. Traction with the strap in ardha Pavanamuktasana works very well. It’s especially nice to have someone do this for you. Understanding the hip anatomy will give you the correct direction of pull in order to create space in the hip.

Thirdly, you’ll utilize your creative knowledge of asana to Stretch the anterior musculature of the hip. If the client can tolerate it, you can prop the back shin on a blanket and have them explore the edge of sensation, where they stay with ujayi breath and focus on the parts of the body that feel good here (can be intense). The intention will be one of steadiness and ease, an internal exploration rather than an external push. As the client progresses, add supta virasana or supported reclined hero pose (single or double leg). Use LOTS of props to make this a comfortable exploration.
Follow with cat/cow and hip circles in tabletop to free the tight errector spinae. Add Setubandasana (supported is also quite nice) for gluteal strength with the new length of the anterior hip musculature. Ardha shalabasana and full shalabasana also work quite well AFTER the hips are open at the front. In time the guarding in the hamstrings will go away because the client is bearing weight over a neutral pelvis. Always incorporate Child’s Pose so the client has moments to restore during the process.

It’s important to keep the thinking cap on. Because the adductors also act as hip flexors, adding creative modifications of mandukasana (frog) are always a welcome addition.
If you’ve put together a sequence that teaches the client to empty to psoas, to create space in the hips and to address the patterns of tightness and weakness, your client will be able to completely change the angle of the bucket of the pelvis, creating relief after even the first session. Over time, you will be able to visualize the change in posture and the relief in the hips, back, knees and SI Joints.
Don’t just mow the grass by giving endless pigeon variations to address the tight piriformis. Dig deeper. Understanding the Lower Crossed Syndrome will make you the hippest Yoga Therapist on the block!
3 responses to “Understanding Lower Crossed Syndrome, Hip Anatomy and Essentials to Becoming a True “Hipster”.”
Trackbacks / Pingbacks
- - February 17, 2015

Super! Thank you so much Lisa!
Jose, You are so very welcome. I hope you are doing well!